知识点梳理

课堂讲义
1)注解驱动的意义
1.1)什么是注解驱动
使用注解的形式替代
1.2)注解驱动的弊端
为了达成注解驱动的目的,可能会将原先很简单的书写,变的更加复杂

2)常用注解(重点)
2.1)启动注解功能
启动注解扫描,加载类中配置的注解项
<!--注解总开关-->
<context:component-scan base-package="com.itheima"/>
说明:
在进行包所扫描时,会对配置的包及其子包中所有文件进行扫描
扫描过程是以文件夹递归迭代的形式进行的
扫描过程仅读取合法的java文件
扫描时仅读取spring可识别的注解
扫描结束后会将可识别的有效注解转化为spring对应的资源加入IoC容器
注意:
无论是注解格式还是
从开发效率上来说注解优于
2.2)bean的定义
名称:@Component
类型:类注解
位置:类定义上方
作用:设置该类为spring管理的bean
范例:
@Component("userService")
public class UserServiceImpl implements UserService {}
说明:@Component的衍生注解,功能类似@Component
@Controller(表现层)
@Service(业务层)
@Repository(数据层)
相关属性
value(默认):定义bean的访问id
@Component(value="beanId")
public class ClassName{}
2.3)bean的作用域
名称:@Scope
类型:类注解
位置:类定义上方
作用:设置该类作为bean对应的scope属性
范例:
@Scope("singleton")
public class ClassName{}
相关属性
value(默认):定义bean的作用域singleton、prototype,默认为singleton
@Scope(value="prototype")
public class ClassName{}
2.4)bean的生命周期
名称:@PostConstruct、@PreDestroy
类型:方法注解
位置:方法定义上方
作用:设置该类作为bean对应的生命周期方法
范例:
@PostConstruct
public void init() { System.out.println("init..."); }
@PreDestroy
public void destroy() {}
小结
开启注解驱动:
<context:component-scan base-package="com.itheima"/>bean的四种注解定义格式:Component, Controller, Service, Repository
bean相关属性注解格式:Scope, PostConstruct(方法上), PreDestroy(方法上)
2.5)加载第三方资源
名称:@Bean
类型:方法注解
位置:方法定义上方
作用:设置该方法的返回值作为spring管理的bean
范例:
@Bean("dataSource")
public DruidDataSource createDataSource() {    return ……;   }
说明:
因为第三方bean无法在其源码上进行修改,使用@Bean解决第三方bean的引入问题
该注解用于替代
@Bean所在的类必须被spring扫描加载,否则该注解无法生效
@Component
public class JDBCConfig {
}
相关属性
value(默认):定义bean的访问id
2.6)bean的非引用类型属性注入
名称:@Value
类型:属性注解、方法注解
位置:属性定义上方,set方法定义上方
作用:设置对应属性的值或对方法进行传参
范例:
@Value("zhangsan")private String username;说明:
value值仅支持非引用类型数据
value值支持SpEL:
@Value("#{'zhangsan'}")@value注解如果添加在属性上方,可以省略set方法
value值支持读取properties文件中的属性值,通过类属性将properties中数据传入类中
相关属性
value(默认):定义对应的属性值或参数值
2.7)bean的引用类型属性注入
名称:@Autowired、@Qualifier
类型:属性注解、方法注解
位置:属性定义上方,方法定义上方
作用:设置对应属性的对象或对方法进行引用类型传参
范例:
@Autowired(required = false)
private UserDao userDao;
说明:
@Autowired默认按类型装配
指定@Qualifier后可以指定自动装配的bean的id
@Autowired@Qualifier("userDao")private UserDao userDao;
相关属性
required:定义该属性是否允许为null
2.8)bean装配优先级配置
名称:@Primary
类型:类注解
位置:类定义上方
作用:设置类对应的bean按类型装配时优先装配
范例:
@Component@Primarypublic class ClassName{}说明:
@Autowired默认按类型装配,当出现相同类型的bean,使用@Primary提高按类型自动装配的优先级,多个@Primary会导致优先级设置无效
2.9)bean的引用类型属性原生注解注入(了解)
名称:@Inject、@Named、@Resource
说明:
@Inject与@Named是JSR330规范中的注解
@Inject = @Autowired ,@Named = @Qualifier完全相同
@Resource是JSR250规范中的注解,可以简化书写格式
@Resource相关属性
name:设置注入的bean的id
type:设置注入的bean的类型,接收的参数为Class类型
小结
属性注入
非引用类型注入:@Value
引用类型注入
@Autowired = @Inject
@Qualifier = @Named
@Primary
@Resource: name, type
2.10)加载properties文件
名称:@PropertySource
类型:类注解
位置:类定义上方
作用:加载properties文件中的属性值
范例:
@PropertySource(value={"classpath:jdbc.properties","classpath:abc.properties"},ignoreResourceNotFound = true)
public class ClassName {
    @Value("${propertiesAttributeName}")
    private String attributeName;
}
说明:
不支持*通配格式
一旦加载,所有spring控制的bean中均可使用对应属性值
相关属性
value(默认):设置加载的properties文件名
ignoreResourceNotFound:如果资源未找到,是否忽略,默认为false
2.11)纯注解格式
名称:@Configuration、@ComponentScan
类型:类注解
位置:类定义上方
作用:设置当前类为spring核心配置加载类
范例:
@Configuration@ComponentScan("scanPackageName")public class SpringConfigClassName{}说明:
核心配合类用于替换spring核心配置文件,此类可以设置空的,不设置变量与属性
bean扫描工作使用注解@ComponentScan替代
AnnotationConfigApplicationContext
加载纯注解格式上下文对象,需要使用AnnotationConfigApplicationContext
当配置类作为 AnnotationConfigApplicationContext 对象创建的参数时,@Configuration注解可以不写
AnnotationConfigApplicationContext ctx = new AnnotationConfigApplicationContext(SpringConfig.class);
2.12)第三方bean配置与管理
名称:@Import
类型:类注解
位置:类定义上方
作用:导入第三方bean作为spring控制的资源
范例:
@Configuration@Import(OtherClassName.class)public class ClassName {}说明:
@Import注解在同一个类上,仅允许添加一次,如果需要导入多个,使用数组的形式进行设定
@Import({JDBCConfig.class, Abc.class})@Bean所在的类可以使用导入的形式进入spring容器,无需使用@Component声明
在被导入的类中可以继续使用@Import导入其他资源(了解)
小结
属性注入:Value, Autowired, Qualifier, Primary, Inject, Named, Resource
加载properties文件:PropertySource -> Value("${key}")
纯注解:Configuration, ComponenScan
第三方导入:Import
3)bean加载控制(了解)
3.1)依赖加载
(1)@DependsOn
名称:@DependsOn
类型:类注解、方法注解
位置:bean定义的位置(类上或方法上)
作用:控制bean的加载顺序,使其在指定bean加载完毕后再加载
范例:
@DependsOn("beanId")public class ClassName {}说明:
配置在方法上,使@DependsOn指定的bean优先于@Bean注解配置的bean进行加载
配置在类上,使@DependsOn指定的bean优先于当前类中所有@Bean配置的bean进行加载
配置在类上,使@DependsOn指定的bean优先于@Component等配置的bean进行加载
相关属性
value(默认):设置当前bean所依赖的bean的id
(2)@Order
名称:@Order
类型:配置类注解
位置:配置类定义的位置(类上)
作用:控制配置类的加载顺序,其中值越小优先级越高
范例:
@Order(1)public class SpringConfigClassName {}
(3)@Lazy
名称:@Lazy
类型:类注解、方法注解
位置:bean定义的位置(类上或方法上)
作用:控制bean的加载时机,使其延迟加载
范例:
@Lazypublic class ClassName {}
3.2)依赖加载应用场景
@DependsOn
微信订阅号,发布消息和订阅消息的bean的加载顺序控制
@Lazy
某个业务灾难出现后对应的应急预案处理bean可以延迟加载
@Order
多个种类的配置出现后,优先加载系统级的,然后加载业务级的
4)整合第三方技术(重点)
4.1)注解整合MyBatis分析
业务类使用注解形式声明bean,属性采用注解注入
建立独立的配置管理类,分类管理外部资源,根据功能进行分类,并提供对应的方法获取bean
使用注解形式启动bean扫描,加载所有注解配置的资源(bean)
使用AnnotationConfigApplicationContext对象加载所有的启动配置类,内部使用导入方式进行关联
4.2)注解整合MyBatis步骤
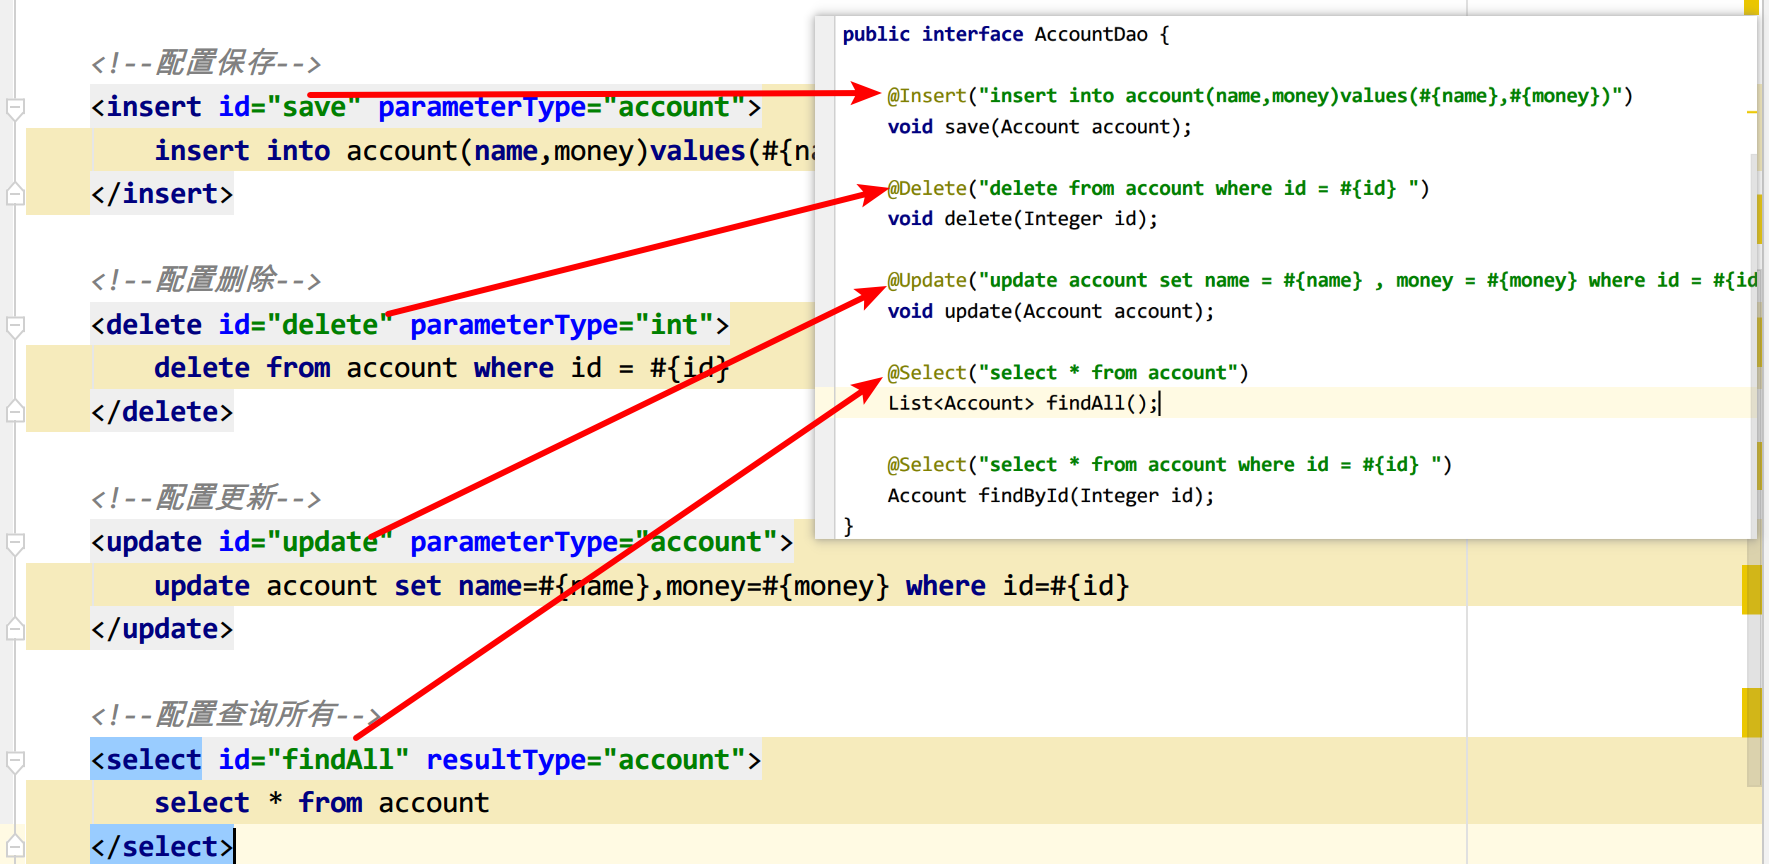
1.修改mybatis外部配置文件格式为注解格式
public interface AccountDao {
@Insert("insert into account(name,money)values(#{name},#{money})")
void save(Account account);
@Delete("delete from account where id = #{id} ")
void delete(Integer id);
@Update("update account set name = #{name} , money = #{money} where id = #{id} ")
void update(Account account);
@Select("select * from account")
List<Account> findAll();
@Select("select * from account where id = #{id} ")
Account findById(Integer id);
}2.业务类使用@Service声明bean,使用@Autowired注入对象
@Service("accountService")
public class AccountServiceImpl implements AccountService {
@Autowired
private AccountDao accountDao;
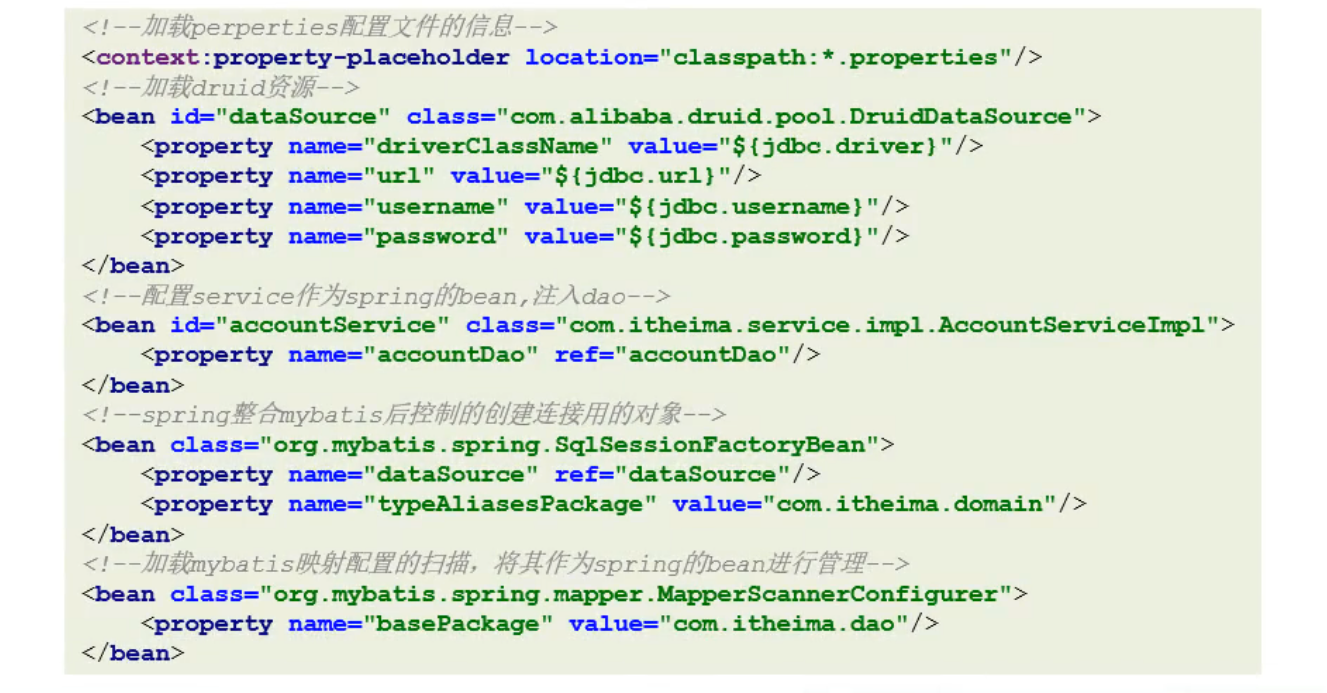
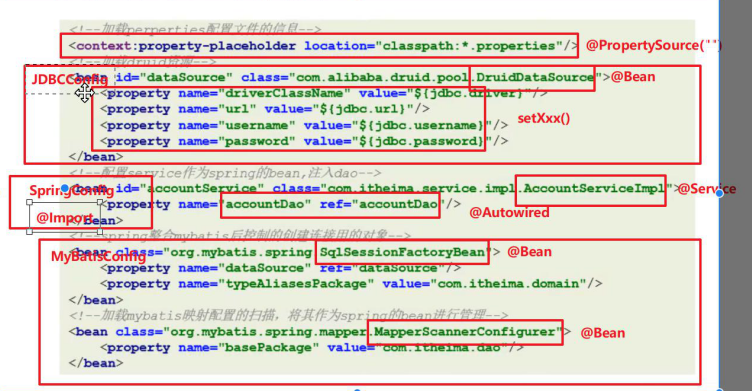
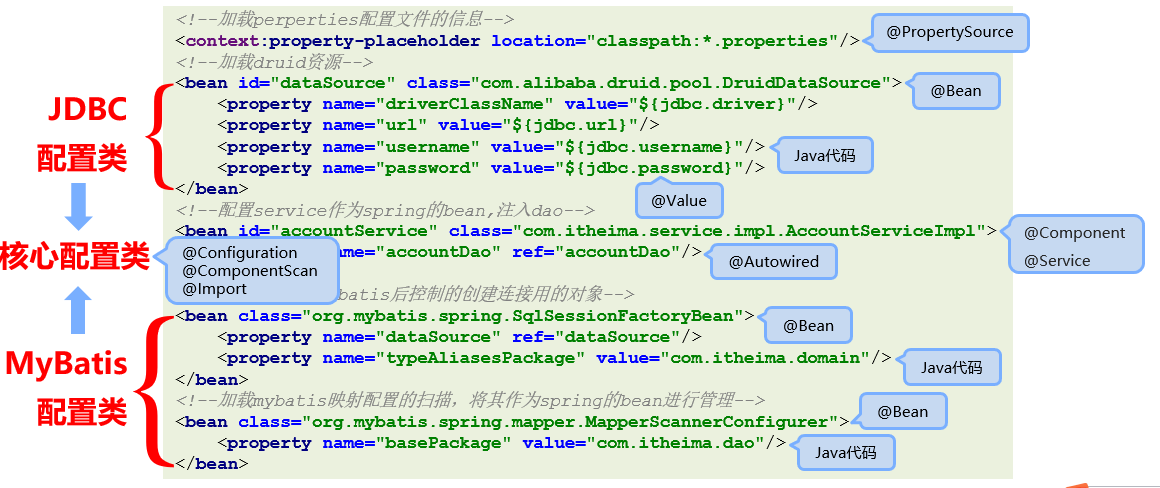
}3.编写Spring配置类:SpringConfig,并加载properties文件
@Configuration@PropertySource("classpath:jdbc.properties")public class SpringConfig {}4.建立配置文件JDBCConfig与MyBatisConfig类,并将其导入到核心配置类SpringConfig
数据源配置类:JDBCConfig
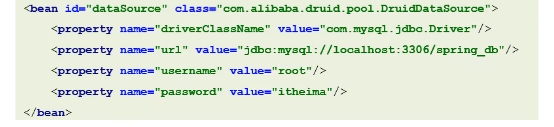
public class JDBCConfig { @Value("${jdbc.driver}") private String driver; @Value("${jdbc.url}") private String url; @Value("${jdbc.username}") private String userName; @Value("${jdbc.password}") private String password; @Bean(value = "dataSource") public DataSource getDataSource(){ DruidDataSource ds = new DruidDataSource(); ds.setDriverClassName(driver); ds.setUrl(url); ds.setUsername(userName); ds.setPassword(password); return ds; }}MyBatis配置类:MyBatisConfig
public class MyBatisConfig { @Bean public SqlSessionFactoryBean getSqlSessionFactoryBean(@Autowired DataSource dataSource){ SqlSessionFactoryBean ssfb = new SqlSessionFactoryBean(); ssfb.setTypeAliasesPackage("com.itheima.domain"); ssfb.setDataSource(dataSource); return ssfb; } @Bean public MapperScannerConfigurer getMapperScannerConfigurer(){ MapperScannerConfigurer msc = new MapperScannerConfigurer(); msc.setBasePackage("com.itheima.dao"); return msc; }}5.开启注解扫描,将JDBCConfig与MyBatisConfig类导入到核心配置类SpringConfig中
@Configuration@ComponentScan("com.itheima")@PropertySource("classpath:jdbc.properties")@Import({JDBCConfig.class,MyBatisConfig.class})public class SpringConfig {}6.使用AnnotationConfigApplicationContext对象加载配置项
public class App {
    public static void main(String[] args) {
        ApplicationContext ctx = new AnnotationConfigApplicationContext(SpringConfig.class);
        AccountService accountService = (AccountService) ctx.getBean("accountService");
        Account ac = accountService.findById(3);
        System.out.println(ac);
   }
}
4.3)注解整合Junit
1.导入Spring整合Junit坐标,从Spring5.0以后,要求Junit的版本必须是4.12及以上
<dependency>
    <groupId>junit</groupId>
    <artifactId>junit</artifactId>
    <version>4.12</version>
</dependency>
<dependency>
    <groupId>org.springframework</groupId>
    <artifactId>spring-test</artifactId>
    <version>5.1.9.RELEASE</version>
</dependency>
2.Spring接管Junit的运行权,使用Spring专用的Junit类加载器
@RunWith(SpringJUnit4ClassRunner.class)
3.加载Spring配置类
@ContextConfiguration(classes = SpringConfig.class)
@RunWith(SpringJUnit4ClassRunner.class)
@ContextConfiguration(classes = SpringConfig.class)
public class UserServiceTest {

    @Test
    public void testSave() {}
}
5)IoC底层核心原理
5.1)IoC核心接口
查看类文件:Ctrl+n
查看类结构:Ctrl+h
查看内部结构:Alt+7

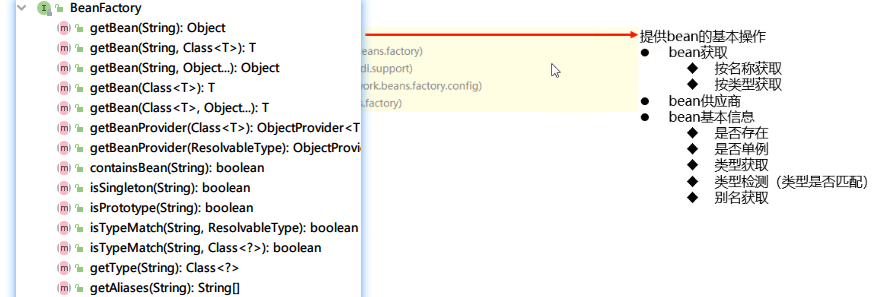
1.BeanFactory接口
2.HierarchicalBeanFactory接口

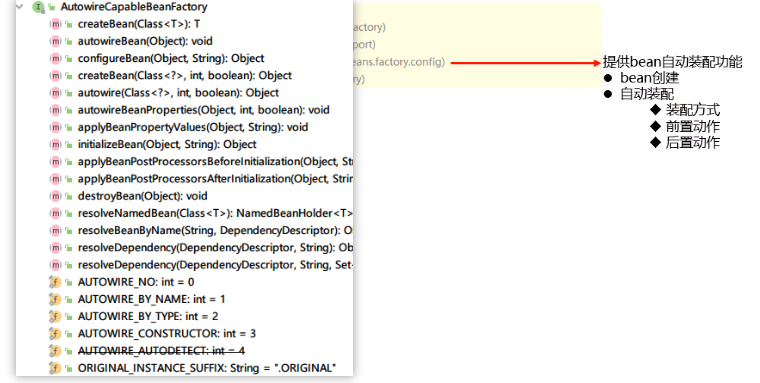
3.AutowireCapableBeanFactory接口
4.ListableBeanFactory

5.2)组件扫描器
开发过程中,需要根据需求加载必要的bean,排除指定bean
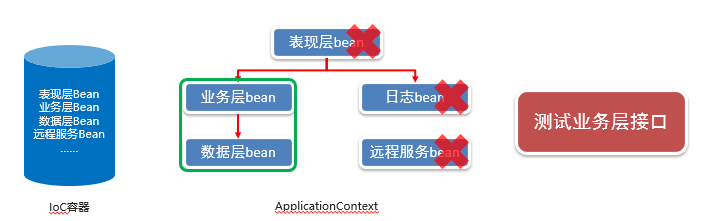
5.3)设定组件扫描加载过滤器
名称:@ComponentScan
类型:类注解
位置:类定义上方
作用:设置spring配置加载类扫描规则
范例:
@ComponentScan(
    value="com.itheima",            //设置基础扫描路径
    excludeFilters =                   //设置过滤规则,当前为排除过滤
 @ComponentScan.Filter(            //设置过滤器
     type= FilterType.ANNOTATION,  //设置过滤方式为按照注解进行过滤
     classes=Service.class)     //设置具体的过滤项,过滤所有@Service修饰的bean
   )
excludeFilters:设置排除性过滤器
includeFilters:设置包含性过滤器
type:设置过滤器类型:ANNOTATION, CUSTOM
5.4)自定义组件过滤器(了解)
名称:TypeFilter
类型:接口
作用:自定义类型过滤器
编写自定义过滤器
public class MyTypeFilter implements TypeFilter {

    @Override
    public boolean match(MetadataReader metadataReader, MetadataReaderFactory metadataReaderFactory) throws IOException {
        //通过参数获取加载的类的元数据
        ClassMetadata classMetadata = metadataReader.getClassMetadata();
        //通过类的元数据获取类的名称
        String className = classMetadata.getClassName();
        if(className.equals("com.itheima.dao.impl.BookDaoImpl")){
            return true;
       }
        return false;
   }
}
使用自定义过滤器:设置排除bean,排除的规则是自定义规则(FilterType.CUSTOM),具体的规则定义为(MyTypeFilter.class)
@ComponentScan(
        value = "com.itheima",
        excludeFilters = @ComponentScan.Filter(
                type= FilterType.CUSTOM,
                classes = MyTypeFilter.class
       )
)
5.5)自定义导入器(了解)
1.回顾如何让Spring管理bean
配置bean的方式如下:
<bean />标签配置
使用@Component及衍生注解配置
2.为什么需要使用自定义导入器
企业开发过程中,通常需要配置大量的bean,需要一种快速高效配置大量bean的方式
实现接口ImportSelector
名称:ImportSelector
类型:接口
作用:自定义bean导入器
范例:
public class MyImportSelector implements ImportSelector { public String[] selectImports(AnnotationMetadata icm) { return new String[]{"com.itheima.dao.impl.AccountDaoImpl"}; } } @Configuration@ComponentScan("com.itheima") @Import(MyImportSelector.class) public class SpringConfig { }1.从properties文件读取需要导入的单个类
public class MyImportSelector implements ImportSelector { @Override public String[] selectImports(AnnotationMetadata importingClassMetadata) { //2.加载import.properties文件中的单个类名 ResourceBundle bundle = ResourceBundle.getBundle("import"); String className = ,bundle.getString("className"); return new String[] {className}; } }#2.加载import.properties文件中的单个类名 className=com.itheima.dao.impl.BookDaoImpl
2.从properties文件读取需要导入的多个类
public class MyImportSelector implements ImportSelector { @Override public String[] selectImports(AnnotationMetadata importingClassMetadata) { // 3.加载import.properties文件中的多个类名 ResourceBundle bundle = ResourceBundle.getBundle("import"); String className = bundle.getString("className"); return className.split(","); } }#3.加载import.properties文件中的多个类名 className=com.itheima.dao.impl.BookDaoImpl,com.itheima.dao.impl.AccountDaoImpl
3.从properties文件读取需要导入的指定包下的所有类:使用自定义的CustomerImportSelector
path=com.itheima.dao.impl.*
5.6)自定义注册器(了解)
名称:ImportBeanDefinitionRegistrar
类型:接口
作用:自定义bean定义注册器
范例:
public class MyImportBeanDefinitionRegistrar implements ImportBeanDefinitionRegistrar { public void registerBeanDefinitions(AnnotationMetadata icm, BeanDefinitionRegistry r) { ClassPathBeanDefinitionScanner scanner = new ClassPathBeanDefinitionScanner(r, false); TypeFilter tf = new TypeFilter() { public boolean match(MetadataReader mr, MetadataReaderFactory mrf) throws IOException { return true; } }; scanner.addIncludeFilter(tf); scanner.scan("com.itheima"); }}
5.7)bean初始化过程解析(理解)

BeanFactoryPostProcessor
作用:定义了在bean工厂对象创建后,bean对象创建前执行的动作,用于对工厂进行创建后业务处理
运行时机:当前操作用于对工厂进行处理,仅运行一次
public class MyBeanFactory implements BeanFactoryPostProcessor { @Override //工厂后处理bean接口核心操作 public void postProcessBeanFactory(ConfigurableListableBeanFactory beanFactory) throws BeansException { //第1阶段 System.out.println("第1阶段:采购手机屏幕和电池..."); }}注意:导入自定义的MyBeanFactory
@Configuration@ComponentScan("com.itheima")@Import(MyBeanFactory.class)public class SpringConfig {...}
BeanPostProcessor
作用:定义了所有bean初始化前后进行的统一动作,用于对bean进行创建前业务处理与创建后业务处理
运行时机:当前操作伴随着每个bean的创建过程,每次创建bean均运行该操作
public class MyBean implements BeanPostProcessor { //所有bean初始化前置操作 public Object postProcessBeforeInitialization(Object bean, String beanName) throws BeansException { //第2阶段 System.out.println(beanName); System.out.println("第2阶段:检查手机屏幕和电池是否正常"); return bean; } //所有bean初始化后置操作 public Object postProcessAfterInitialization(Object bean, String beanName) throws BeansException { //第4阶段 System.out.println("第4阶段:检查手机功能是否正常"); return bean; }}@Configuration@ComponentScan("com.itheima")@Import({MyBeanFactory.class, MyBean.class})public class SpringConfig {}
InitializingBean
作用:定义了每个bean的初始化前进行的动作,属于非统一性动作,用于对bean进行创建前业务处理
运行时机:当前操作伴随着任意一个bean的创建过程,保障其个性化业务处理
@Service("mobileService")public class MobileServiceImpl implements MobileService, InitializingBean { @Override public void create() { System.out.println("手机要出厂啦..."); } @Override //定义当前bean初始化操作,功效等同于init-method属性配置 public void afterPropertiesSet() { //第3阶段 System.out.println("第3阶段:购买红外设备"); }}
5.8)繁琐的bean初始化过程处理(了解)
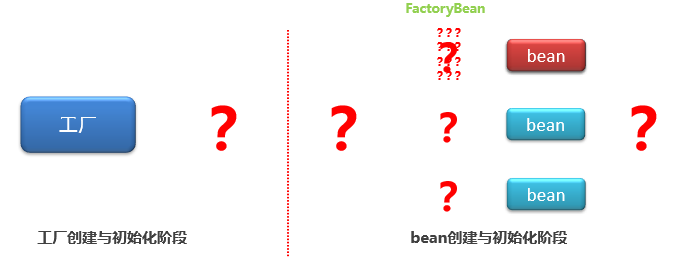
举例实现FactoryBean接口:MyBatis中的SqlSessionFactoryBean实现
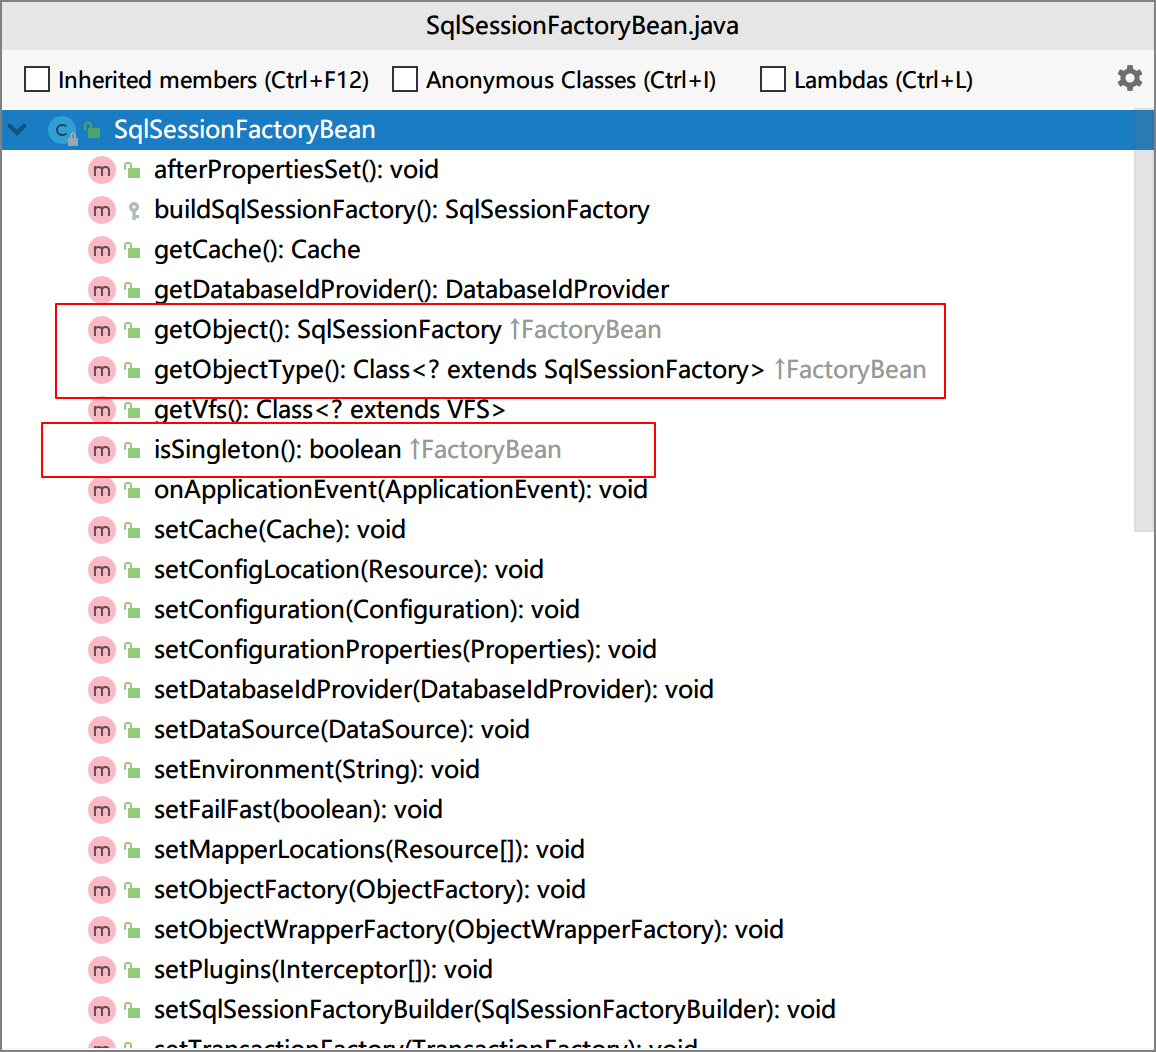
对单一的bean的初始化过程进行封装,达到简化配置的目的:
public class EquipmentDaoImplFactoryBean implements FactoryBean {
@Override
public Object getObject() throws Exception {
return new EquipmentDaoImpl();
}
@Override
public Class<?> getObjectType() {
return null;
}
@Override
public boolean isSingleton() {
return false;
}
}配置FactoryBean:
@Configuration
public class SpringConfig {
@Bean("equipmentDaoImplBean")
public EquipmentDaoImplFactoryBean equipmentDaoImplBean() {
return new EquipmentDaoImplFactoryBean();
}
}获取方式:
public class App {
      public static void main(String[] args) {
          ApplicationContext ctx =
                  new AnnotationConfigApplicationContext(SpringConfig.class);
          EquipmentDao equipmentDao = (EquipmentDao)ctx.getBean("equipmentDaoImplBean");
          equipmentDao.save();
}
FactoryBean与BeanFactory区别
FactoryBean:封装单个繁琐bean的创建过程
BeanFactory:Spring容器顶层接口,定义了bean相关的获取操作''[[
原文转载:http://www.shaoqun.com/a/612593.html
易速:https://www.ikjzd.com/w/2389
亚马逊t恤:https://www.ikjzd.com/w/1932
spring注解开发:bean的定义,bean的作用域,bean的生命周期,注解加载第三方资源,bean的引用类型注入,bean的优先级,加载文件,第三方配置与管理,bean的加载控制,spring注解整合mybatis,spring注解整合Junit,Ioc的核心组件:扫描器,过滤器,导入器,注册器知识点梳理课堂讲义1)注解驱动的意义1.1)什么是注解驱动使用注解的形式替代1.2)注解驱动的弊端
拍怕网:https://www.ikjzd.com/w/2205
feedly:https://www.ikjzd.com/w/754
贝恩:https://www.ikjzd.com/w/1336
亚马逊新手卖家开店前的必备工作有哪些?:https://www.ikjzd.com/home/137726
10个精美Shopify产品详情页案例分享!:https://www.ikjzd.com/home/110657
Wish全球12国蓝海产品类目,发掘新商机:https://www.ikjzd.com/tl/107586
没有评论:
发表评论